
My wife is a huge Olympics junkie and likes to host large parties to view the opening ceremonies. Jell-O shots in the colors of the Olympic Rings, flip cards to score the costumes in the Parade of Nations, the whole enchilada. So for the 2020 (really 2021) Summer Olympics, I decided too make her an animated LED “rings” display to help set the mood for the party.
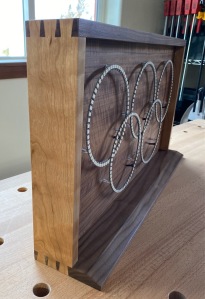
I based the design on these Adafruit 60-LED 6″ pixel rings, which at the time were available as completely assembled rings. Since my other hobby is hand tool woodworking, I made a framey-thing to mount the rings and house the power supply/controller. [Secret woodworker guild notes: hand-cut dovetailed walnut/cherry frame, figured walnut veneer front/back, spray lacquer finish]. I used sections of acrylic rod to mount the rings, epoxied to the back of the rings and screws through the 1/4″ thick front panel. Note that the bottom two rings are slightly above the top three rings, with the LEDs carefully aligned.
For the controller I used my OpenRocket board (name = long story for another time), which I’ve used for several other projects that I haven’t posted about yet.

The OpenRocket Led controller board is based on the the PJRC Teensy 4.0 microcontroller (MCU), and provides the following features:
- Five outputs (with 3.3v to 5v level shifters) to drive addressable LED strips
- Four general purpose PWM MOSFET outputs to drive non-addressable LED strips, motors, solenoids, etc.
- Two debounced, general-purpose switch inputs to trigger sequences, set modes, etc.
- An input for a PIR motion sensor for sequence triggering
- A differential I2C interface to support remotely-located sensors, including an ambient light sensor.
- A differential RS-485 interface to support communication with other lighting controllers.
- A battery-backed real-time clock (RTC)
- A micro-SD cards reader to store light sequence scripts and color palettes
For this project I only used a small subset of the features. I used a separate LED output for each of the 5 rings, although I could have wired the rings in series and used a single output. I mounted a momentary-action pushbutton switch to the back panel, and customized the firmware to provide the following features:
- Short press (when off) to turn unit on and restart the last-used lighting sequence (script)
- Long press to turn unit off
- Short press (when on) to cycle through three different brightness levels
- Double-press (when on) to cycle through different sequences/scripts that are present on the SD card
So far I’ve only implemented two scripts: the first uses a “swirl” effect to alternately display the official Olympic Rings colors (substituting white for black) and the USA flag colors. The second is a “fireworks” display to celebrate a win or great performance. Here’s a demo video.
Although some of my earlier projects used portions of the popular FastLED library, I’ve since weaned myself off of it. Two major reasons for this:
- FastLED was designed to work across a wide range of Arduino-compatible microcontrollers, including those with extremely limited memory and processing performance. To some extent, this prevents the FastLED code from taking advantage of the capabilities of high-performance MCUs like the Teensy 4.0, with a 32-bit architecture, tons of memory, and a floating-point unit. Also, the extreme degree of code optimization to squeeze very drop of performance from an 8-bit MCU makes the FastLED API and the underlying source code hard to understand (and modify, which is sometimes necessary).
- I wanted the experience of coding the lighting effects to my own specifications (or my client’s), rather than relying on the pre-existing effects in the library or those contributed by other users. Many of my projects require specialized effects that are tied to a unique layout of various types of LED light “fixtures” (not just linear strips), and it seemed unlikely that existing FastLED effects would support these projects without extensive modifications.
On the other hand, there were two factors that made it difficult to completely let go of FastLED. One of the most complex parts of FastLED is the code that transfers the buffer of RGB color data (24 bits per module) to the attached LED strips using the single-wire WS28xx serial data protocol. While “pushing” out the serial data bits in compliance with the strict timing requirements of the protocol, FastLED also implements other real-time functions such as LED temporal dithering and power limiting. Since I didn’t need or want these relatively complex features, I could have written my own code to implement just the serial data protocol. But I found a better route: PJRC provides the OctoWS2811 LED Library which implements the LED data transfer using the direct-memory access (DMA) controller that’s built into most Teensy MCU boards. Because the DMA controller operates independently with minimal impact on the microprocessor core, LED data transfers are performed in parallel with normal program execution. This results in a dramatic performance improvement compared to FastLED, where the LED data transfer (30 µS per 24 bit module) can consume nearly 100% of the processor bandwidth during the transfer period. Note that the OctoWS2811 library is specific to the Teensy family of MCUs, but I believe that there are similar libraries for other MCUs that also use DMA or other on-board hardware for LED data transfer.
The second factor that caused me to linger in FastLED-land was its support for the HSV color space, including fast routines for conversion from HSV to the “native” RGB color space used by the LEDs. As explained in the linked FastLED documentation, it’s much easier to create blend/fade type effects using HSV, and then convert to RGB just before sending the data to the LEDs. So for several projects the only part of FastLED I used were the HSV-to-RGB conversion functions. Eventually I wrote my own conversion functions, partly by reverse-engineering the cryptic FastLED code and by struggling to understand the mathematical basis. Since some of my fixtures and associated driver circuits support 12- and 16-bit PWM control (for smoother fades), I extended the conversion functions to support several different sizes of fixed-point data types. However, I soon realized that it was silly not to use the floating point unit (FPU) on the ARM Cortex-M7 600MHz processor on the Teensy board. So I rewrote everything to use floating-point math, and now the code is much cleaner, and probably faster, too.
Shortly after I finished that (and waved a fond farewell to FastLED), I discovered this article explaining why HSI is much better color space than HSV for LEDs projects. Whhaaat!? But the argument was compelling, so I rewrote the code once again. A benefit was that it gave me a relatively simple way to support RGBW LEDs, using the white ![]() channel to create higher-quality desaturated (i.e., “pastel”) colors and pure white (instead of R+G+B). I’ve now created a general-purpose library that supports the following functions:
channel to create higher-quality desaturated (i.e., “pastel”) colors and pure white (instead of R+G+B). I’ve now created a general-purpose library that supports the following functions:
- HSI to RGB conversion, where both the three HSI component values and the three RGB values are floating point numbers
- HSI to RGBW conversion (floating point)
- RGB to PWM conversion, where the three integer PWM values have a specified range/resolution (e.g., 8, 12, or 16 bits)
- RGBW to PWM conversion, producing four variable-resolution PWM values
- Various functions to blend/interpolate between two HSI colors
Overall this was a fun project that stretched both my software and woodworking skills. My wife liked it and appreciated the total geekiness of it, but I think it might have confused some of our friends at the party, as in: “what is that…and why”? Oh well, they’ll get to see it again at the upcoming Winter Olympics party.


Cool! One suggestion is bare led’s can be glaring. Sugest to add diffuser either along each ring, or could be a single diffuser plate fitted over entire area.
LikeLike
Agreed. I generally don’t like the look of bare LEDs, and have explored many different diffuser solutions for different projects. But for this one I decided to go “naked”, partly to avoid covering the nice walnut front.
LikeLike
Hey Keith, love the blog, re-reading all your older stuff.
Do you have a github or other space for the HSI to RGB library you mention? Also, I’m really interested in the pixel mapping functionality mentioned in the manta posts.
My friends and I are hoping to make some big art for the burn this year and it would be wonderful to be able to incorporate and build onto your effects.
LikeLike
Hi! Thanks very much for the feedback! I’m really happy to hear that your enjoying my blog (including my tangential comments about jello shots). Yes, I’m happy to share my code, especially if it will be used to make cool art! I already have a couple of public git repos for both of the libraries you mentioned. I think the HSI-to-RGBW library is pretty stable and pretty bug-free: https://github.com/Aerokeith/ColorUtilsHsi/blob/master/src/ColorUtilsHsi.cpp
The “EffectUtils” repo contains everything I used for the Manta, but doesn’t yet include the updates for the Shark. And I wouldn’t call it “stable” in terms of the rate at which I change my mind about how it should work. But it will give you some good ideas about how to apply this technique. Once you get the basic concepts down, you can really go wild.
https://github.com/Aerokeith/EffectUtils
Let me know what you think.
keith@electricfiredesign.com
LikeLike
I love the effect utils library, super professional. Have you ever thought about making 3d functionality? from what I see everything is 2D here. I would be really interested in experimenting with this. I wonder what the cleanest way to implement that would be? New library entirely? New classes like Wipe3d? Add the functionality into the existing classes? (<–I worry that would get messy and confusing very quickly)
LikeLike