
Sorry, it’s been 4 months since I posted anything. So, so busy, mostly in preparing for my annual trip to Burning Man in the Nevada desert. Normally I would have been designing and building the lighting for a large sculpture created by my artist friend Peter Hazel, but this year he decided not to bring any artwork. We got invited to join a large (~200 person) camp/village called Frothville, so I volunteered to build some lighting for a large structure called The Gallery, placed in a prominent location at 9:45/Esplanade. That project is described below, along with some updates on other projects that I’ve written about previously.
In case you’re unfamiliar with Burning Man, here’s a great LA Times article written by a member of our camp. It’s a good counterpoint to the end-of-the-world descriptions of the 2023 “mud-ocalypse” from some other media outlets. [I’m in two of the photos — see if you can find me!].
Gallery Towers
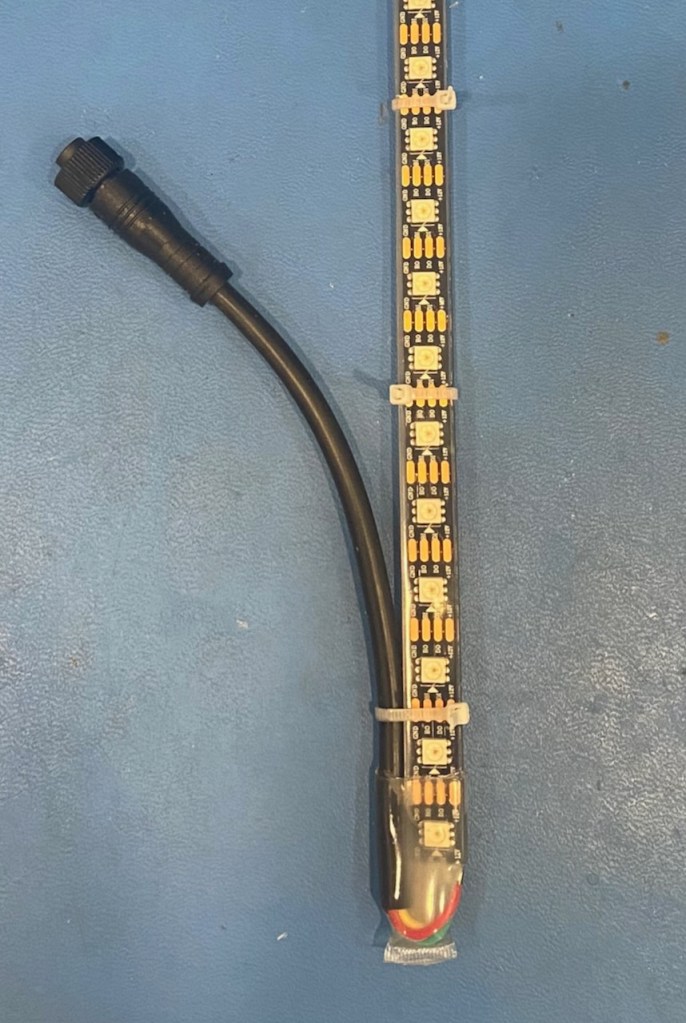
The Frothville leaders asked me to create lighting for three towers that would comprise the main elements of the Gallery structure (see photo above). Two of the towers were 20′ (6m) tall and one was 15′ (4.6m). I decided to create LED tubes that would run up the corners of each tower, using a technique that I started experimenting with last year (as described in this post). As with most of my recent projects, I used custom-fabricated, fully dust- and waterproof (IP68-rated) WS2815 addressable LED strips, as described in this post and this post. The manufacturer (BTF-Lighting) has recently made some improvements, including reduced power consumption and a stronger/more waterproof connector with larger-gauge wires.

Since the tubes would be zip-tied to vertical steel scaffolding posts, it wasn’t necessary to achieve a full 360º viewing angle with uniform brightness. So I was able to use a single strip in each tube, versus the double-side approach that I previously experimented with. One-inch diameter PEX plumbing pipe was large enough to accommodate the sleeved IP68 strips, and provided excellent pixel diffusion. Small zip-ties attached to the LED strip provided perfect “spacers” to keep the strip pressed against the back of the PEX tube, maintaining uniform diffusion along the length of the tube.
To facilitate transportation, the tubes were built in modular 10′ and 5′ sections to be assembled on-site. Within each section, the LED strip is fully sealed at both ends, and the tube section is sealed at one end with large-diameter, crimped heat-shrink tubing. To minimize the inter-pixel gap where two sections are joined, the connecters are doubled back alongside the strips. After the sections are joined on-site, additional large-diameter heat-shrink (non adhesive) is applied around the tubes to strengthen the mechanical connection and provide further water/dust-proofing. All this waterproofing turned out to be a good idea, and the lighting continued to operate just fine through the large amounts of rain we had this year on the playa.


Gallery Towers – Controller Hardware
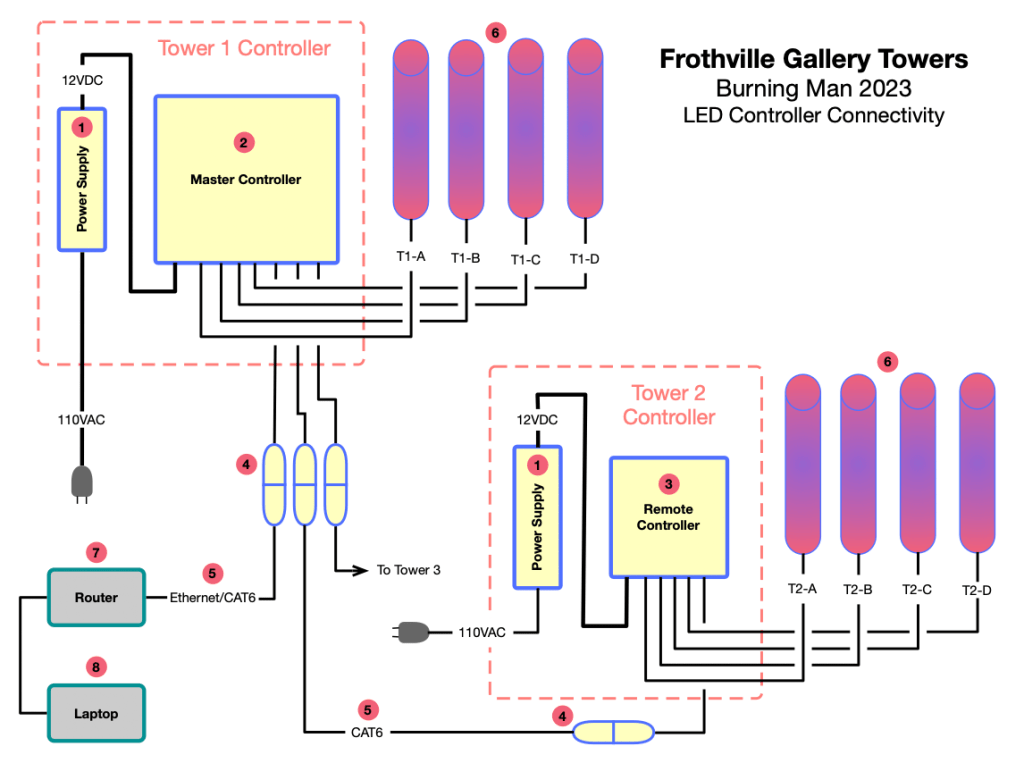
To make it easier for other camp members to maintain and modify the tower lighting in future years, I decided to use an off-the-shelf controller solution, rather than my typical full-custom hardware/software approach. In particular, I wanted to avoid a system that would require writing or modifying software code. Also, the controller needed to be able to handle the long cable runs between the towers (up to 75′ [23m] due to routing restrictions).
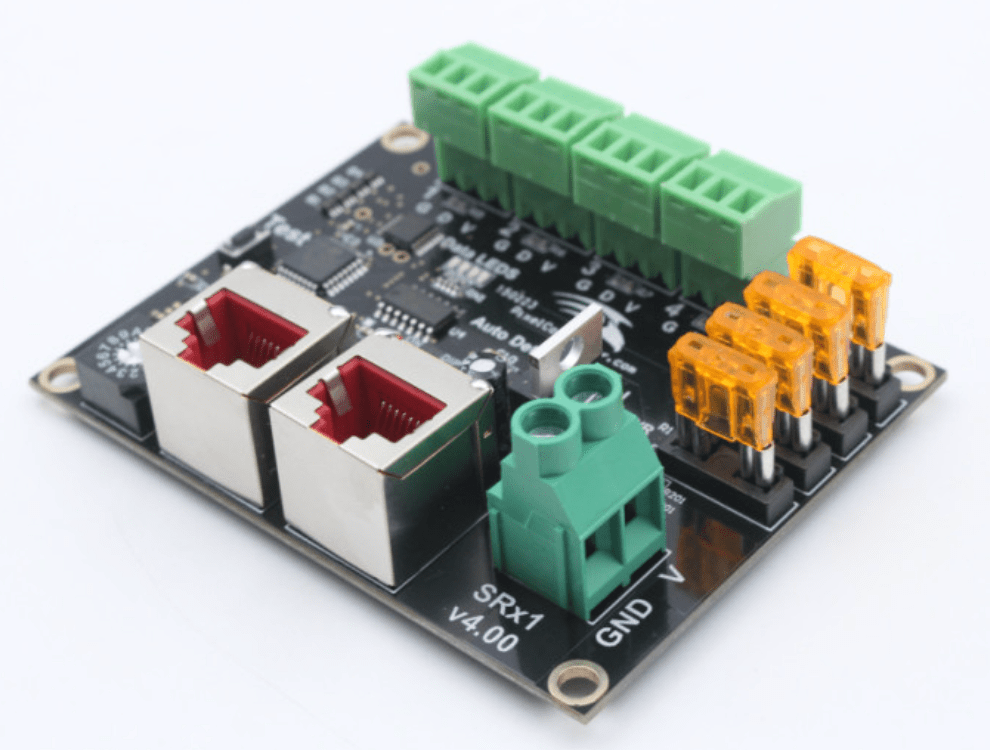
I found the perfect hardware/software products in the robust “holiday lighting” market space. I chose the Pixelcontroller Falcon F16v4 controller, combined with two SRx1 V4.00 (Long Range) SmartReceiver boards. Each board controlled four LED tubes in one of the three towers, with between and 270 and 357 12V pixels per tube. The use of differential twisted pair CAT6 cabling between the “master” controller and the two “remote” controllers eliminated any issues related to distance.


Gallery Towers – Software
Controllers like the Falcon F16v4 are typically used with an open-source software package called xLights, which has been maintained and improved over more than a decade. xLights provides a highly graphical approach to both configuration of the lighting system as well as design and execution (“playing”) of lighting sequences and playlists (groups of sequences). In the configuration and design phase of the project, xLights runs on a laptop and sends low-level commands to the main controller via an ethernet connection using the ethernet-based ANSI E1.31 protocol, also called ACN or streaming ACN (sACN). When the design of the sequences/playlists is completed, they can be uploaded to a microSD card on the Falcon controller and played in a standalone mode without the laptop.
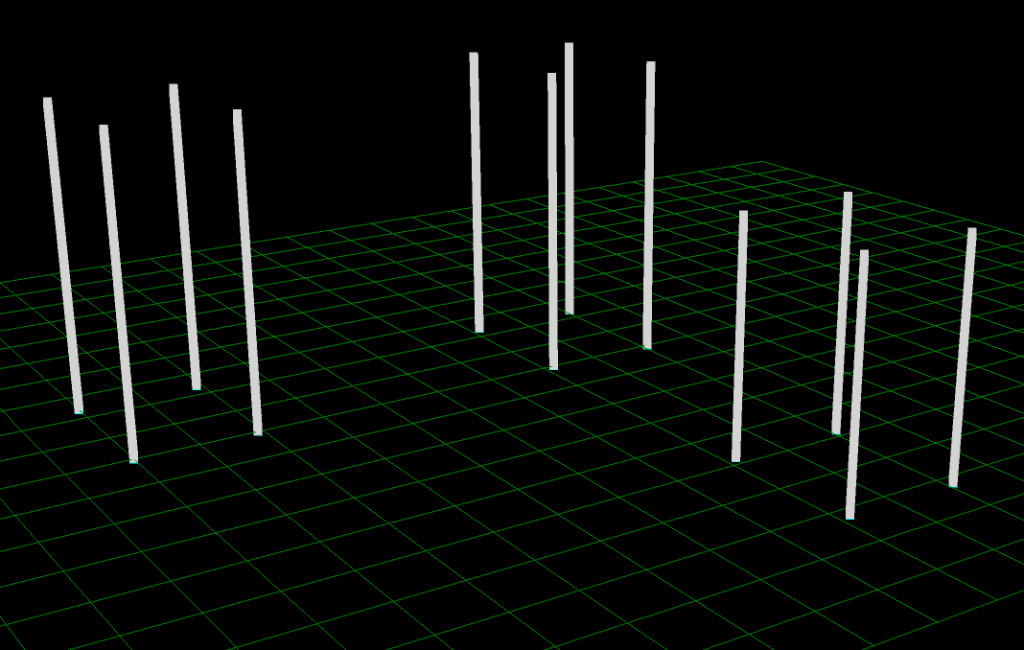
The configuration process involves defining each of the physical lighting elements, called “props” in holiday-lighting parlance, in terms of size, position, and number of pixels. Each prop (each LED tube in my case) is represented as a “model” in xLights. xLights can work in either two or 3 dimensions, so I created a 3D model for each of the tower LED tubes. Then each model is mapped to one of the LED outputs on the main or remote controller boards.
Sequence design is accomplished using a graphical timeline editor, leveraging a large library of pre-defined (but highly configurable) “effects”.

The sequences can be visualized in real time on the 3D model, or by sending the sequences to the actual lighting elements, or both simultaneously. Here’s an example visualization:
As usual, I didn’t get any good photos of the finished project (arghh!), but one of my campmates took this excellent video that shows some of the lighting. The art car (Dragomi) behind the towers was also part of our camp.
I’m really happy with how this project turned out, and I think the camp will expand on this design in the coming years. One of the highlights was that my wife Lorraine allowed her inner geek to emerge, and she ended up doing most of the sequence design. She has no programming experience, so this gives me confidence that I met my easy-to-maintain-and-modify goal.
Having said that, I probably won’t use this approach for my normal art-lighting projects. I like having the complete control that my full-custom approach provides, both for the hardware and software. But I’ll definitely steal some ideas from the xLights software, which embodies some really powerful paradigms for how effects can be configured, combined, and layered. These paradigms are pretty well aligned with my current effects-library approach, but goes much further. More on this in future posts.
Playa Bike
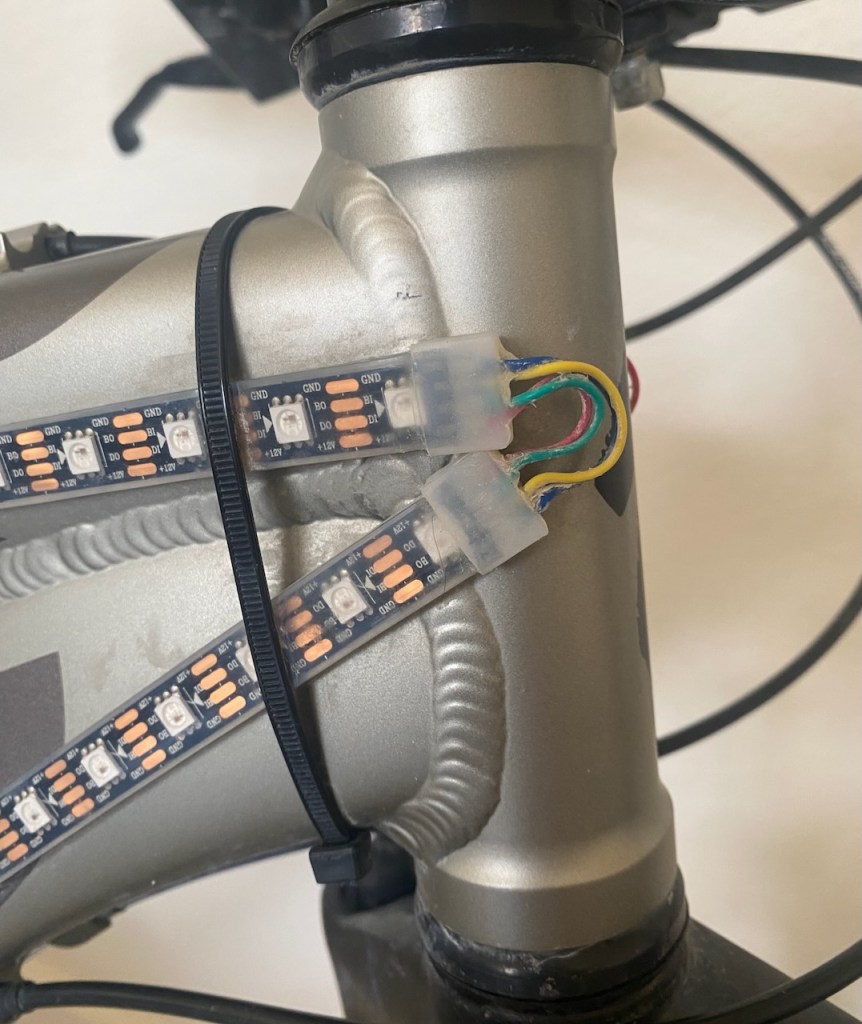
This year I finally got our Burning Man bikes decked out with some decent LED lighting. The hardware is nothing new: my FLiCr controller, a 12V/11Ah lithium ion battery pack, and some leftover pieces of WS2815 IP68 LED strip. I cut pieces of LED strip to fit each relatively straight section of the bike frame’s main triangle and soldered wires between each strip segment to allow bending. I used silicone end caps and silicone caulk to water/dust-proof the connections.

I only had time to implement two effects. The Sparks effect was intended to look like bits of molten metal flying off the bike as it’s being ridden as hypersonic speeds across the playa (of course, while actually observing the 5 mph playa speed limit). Cylon is a classic effect, with red LEDs scanning back and forth, and was intended for when the bike is parked. The original idea was to automatically switch between effects using an accelerometer to detect forward motion. That didn’t get finished, so I just used a pushbutton switch to toggle between modes. My implementation of these effects is an extension of some techniques that I’ve written about previously, and I thought you might be interested in hearing more details about them. The overall goal of these techniques is to enable the implementation of animation effects that are independent of the physical orientation of the LED strips.
The first step was to define a 2-dimensional coordinate system for the bike, with the origin at the top of the head tube, the positive x-axis running parallel to the ground toward the back of the bike, and the positive y-axis running straight up. A rotation of 0º was defined to be along the positive x-axis, with angles increasing in a counter-clockwise direction when viewed from the bike’s left side. For each LED strip segment, I measured the following parameters: 1) the x-y position (offset from origin) of the first pixel on the input end; 2) the rotation angle of the segment (averaged if the segment followed a somewhat curved bike tube); and 3) the number of pixels in the segment. This data went into a table in the project configuration header file, and looked like this:
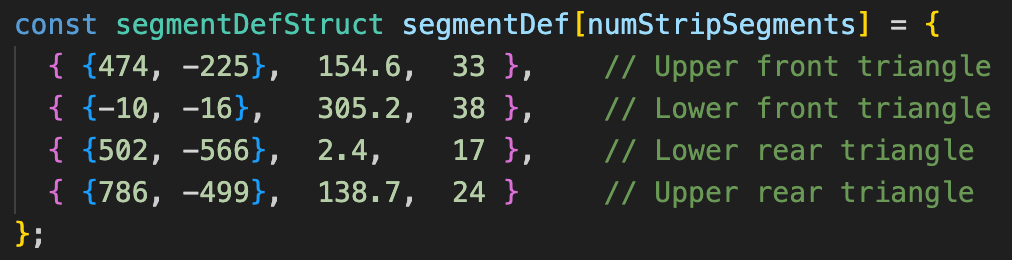
Note that I only had to do this for the left side of the bike, since the right-side segments are a mirror image. During execution, all the animation are computed for the left side only, and the identical pixel data is sent to the LED strips on both sides.
I had previously written some library functions that use simple trigonometry to compute the x-y position of a pixel in a multi-segment LED strip using the type of configuration table shown above. Since the animations require recomputing the color/brightness of each pixel in the entire strip for each animation frame (at a typical rate of 30-100 frames/sec), I optimized the library functions for sequential access (i.e. pixels n, n+1, n+2…).
Animations are based on motion, so the next key element is a category of functions that I call movers; they simulate the motion of a single reference point through the 2D coordinate system. The mover function that I used for the Sparks and Cylon effects is actually only one-dimensional, simulating three phases of motion along the x-axis:
- Phase 0: Accelerate from initial velocity vinit to velocity v1 in duration t0, moving the reference point a distance d0 from its starting point.
- Phase 1: Move the reference point at constant velocity v1 for a distance d1, such that the total distance moved in all three phases will be a specified dtotal.
- Phase 2: Decelerate from v1 to final velocity vfinal, moving a distance d2.

The Cylon effect uses vinit = vfinal = 0 to create smooth back-and-forth motion with a brief stop at each end. The Sparks effect eliminates phase 2 by setting t2 = 0, so that the sparks accelerate and fly off the back of the bike.
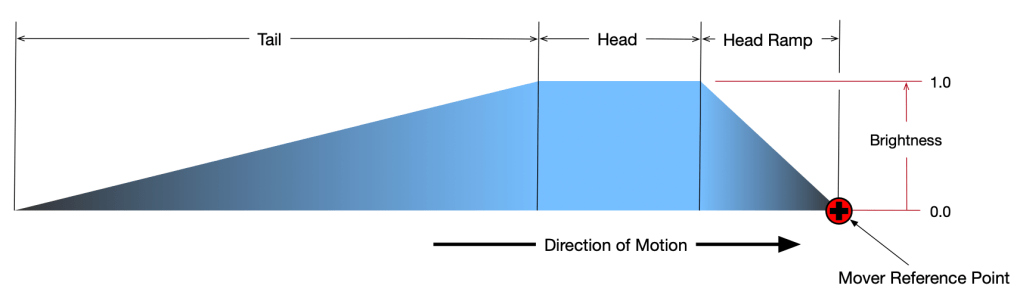
So now we have an animated reference point, and the ability to determine the x-axis position of each pixel relative to the reference point. Now we need an effect-specific profile function that determines the color/brightness of a pixel based on its distance from the reference point as well as the mover function’s direction of travel.
For the Sparks effect, I used a teardrop-shaped profile similar to the one I used for the Waterfall project. This profile only modifies the brightness of the current spark color, which itself is varied across a defined color range over a longer time period.
Now we have all the necessary pieces to execute the animations. For every animation frame (10ms) the following steps are performed:
- For every pixel in the left-side LED strip:
- Compute the x-axis position of the pixel and the distance (+/-) from the mover reference position
- Call the profile function to compute the pixel color/brightness based on the relative position of the mover and it’s direction of motion (if applicable)
- Set the color/brightness for the pixel in the internal LED data array, for both the left- and right-side LED strips.
- Send the stored LED data to both strips
- Call the mover function to update the reference position based on the current velocity/acceleration. If the reference position has reached the “end of travel”, restart the mover and reverse the direction (Cylon) or restart the mover from the original starting point (Sparks).
Here are some videos of the two effects. While it’s probably true that there are easier ways to implement these particular effects, I wanted to use them as simple examples of a very powerful approach to LED animation.
Dust Slug
Ok, one one more thing about Burning Man and then we’ll move on, promise!
This year a friend (Brad Weber) built a new mutant vehicle/art car called the Dust Slug. The platform vehicle is a retired open-air bus previously used for movie studio lot tours. The “tentacles” are sewed from rip-stop nylon fabric, and Brad designed a clever air duct system (with 3D-printed parts) to keep the tentacles inflated.
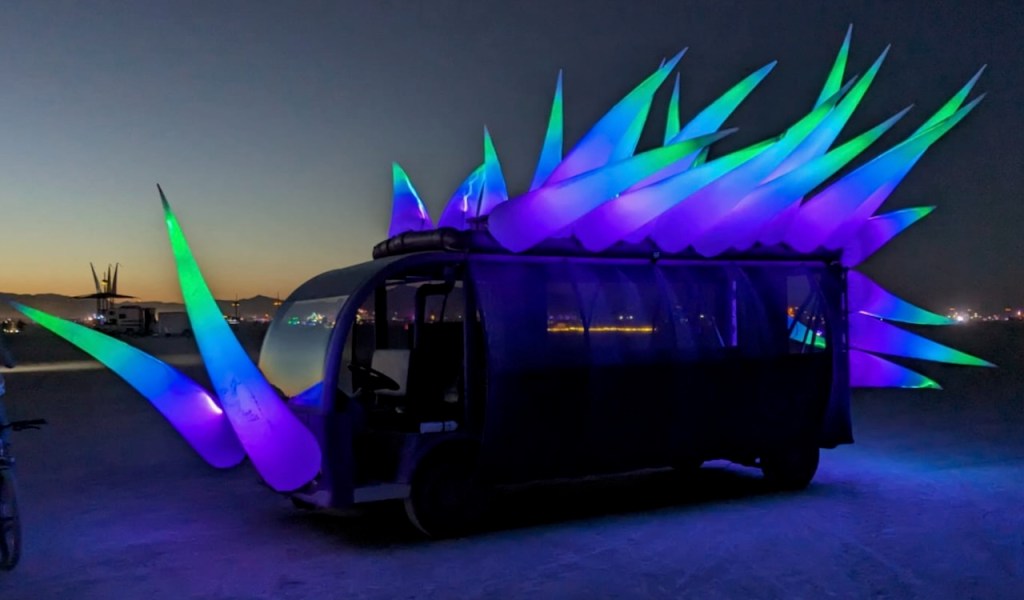
Brad used the same IP68 WS2815 LED strips as I did, but with an inexpensive off-the-shelf controller with pre-defined, sound-reactive lighting sequences. A segment of LED strip is velcro-strapped to the inside of each tentacle, facing inward. The air pressure was sufficient to keep the tentacles aloft even with the not-insignificant weight of the strips.The diffusion and light uniformity was excellent, with only a narrow dim stripe where the LED strip is pressed against the tentacle fabric.
Peacock

As part of a competition to be selected to create a large piece of public art here in Reno, NV, Peter Hazel proposed building a huge peacock with stainless steel and glass. He built a 4-foot tall prototype section, shown at right. The peacock would be front lit with RGBW spotlights, and the color-glass “eyes” in the feathers would be backlit with small, localized light sources. For the prototype I built some quick-and-dirty backlights that were about 2 inches thick. These looked great at night but were unacceptable for the final piece (too thick, not transparent during daytime).
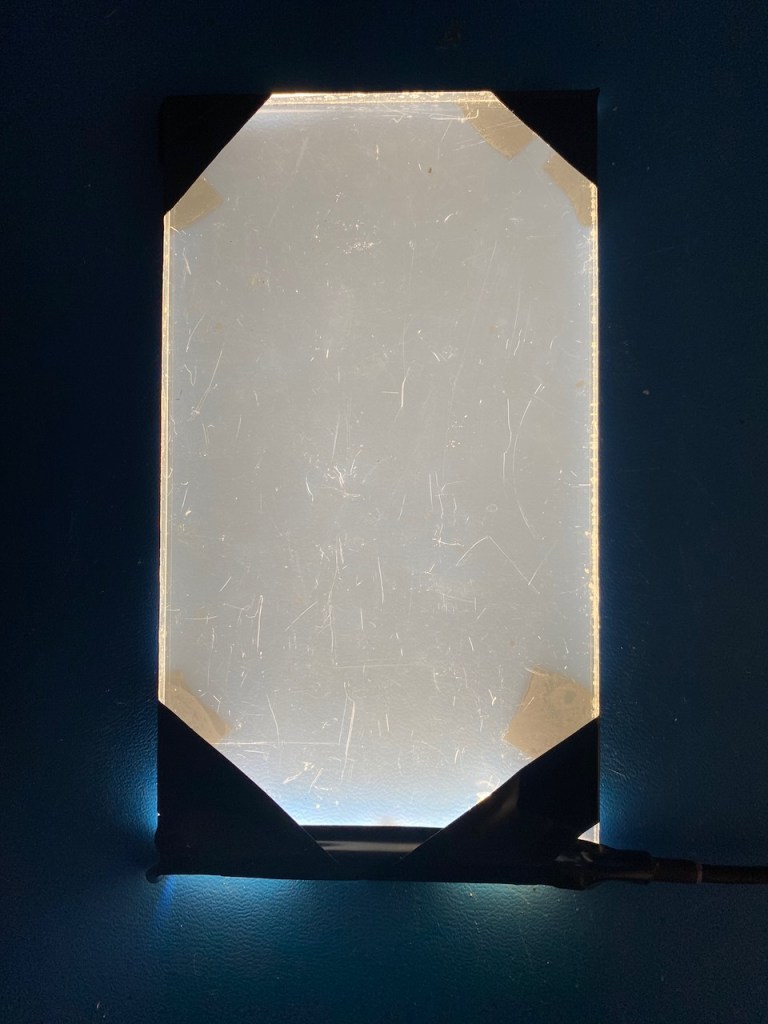
It occurred to me that this project is another perfect candidate for the edge-lighting technique I previously experimented with in connection with the Butterfly Tree (Dancing Monarchs) project. This would involve sandwiching a piece of special acrylic between two pieces of colored glass, with a short section of LED strip shining into the bottom edge of the acrylic. The acrylic would be completely transparent during daylight, allowing sunshine to pass through and illuminate the glass. At night the light from the LEDs is reflected outwards by microscopic particles embedded in the acrylic, giving it a milky white appearance. The photos below are the result of a quick test with my only sample of the material.

Ultimately Peter wasn’t selected for the the public art project, but I suspect the Peacock will eventually get built for some other customer.
Trees

The stainless steel and glass Aspen Tree that I wrote about earlier this year hasn’t seen much progress. The plan for the lighting is still to use a number of small spotlights (see FidoLights below) mounted inside the branches and aimed upward at the leaves. I think this will look OK, but won’t have much of a wow factor.
Peter and I are now talking about a much bigger tree with hundreds of leaves using the internal/edge-lit approach described above for the Peacock. This will provide individual color control for each leaf, and could be quite spectacular. Due to the scale, I’ll need to come up with ways to make the lighting components very easy to assemble and maintain. Stay tuned for more on this.
FidoLights

Not a whole lot new to report on this since my May 2023 update. The one bit of progress is that I had PCBWay assemble 20 boards for me. This was the first time I tried their assembly service, and it was pretty smooth. Amazingly, the total cost per board was only $7, including all components and the PCB. For me, the low-quantity, components-only cost is $10.

I haven’t had a chance to test them yet, but I’m confident that they’ll work fine – there’s not that much that could go wrong on such a small board!
Whew! That was a lot! I hope I didn’t bore you to death. Remember that I’m open to suggestions for future articles, and will always respond to questions and comments.
Thanks for reading! In case you haven’t already discovered this, an index of all 38 of my previous blog posts can be found here.

One thought on “Project Updates: September 2023”