
Things have been a bit slow since my return from Burning Man, and I feel a bit guilty about not having anything really juicy to post about. It’s mostly my fault, since I’ve become somewhat obsessed with building a deck in my back yard and trying to finish before it gets really cold here in Nevada. So instead of a single big project, I’ll ramble on about some smaller things that I’ve been up to.
Desert Shark

The plan is still to install the shark here in Reno, but it’s currently sitting in a sad, semi-disassembled state in front of Peter Hazel’s studio. Peter has been too busy catching up with other projects, but I’m expecting a call-to-action any day now.
On the Playa, we decided that the stainless steel fins need more/better lighting (it doesn’t look as good as the photo above suggests). Lesson learned here: I didn’t provide any spare power supply or controller channels to accommodate any expansion. So I’ll have to piggyback on the existing channels, which may require some creative wiring.
LED Tubes
While discussing potential art pieces with Peter for next year’s Burning Man, I realized that I needed to add something to my lighting bag of tricks: a flexible LED light tube. While pre-assembled LED tubes/wands can be purchased from multiple sources, none of these appear to meet all of my requirements:
- Flexible, with two variations: a) bendable into a static shape; or b) flexible enough to move freely in a 5+ mph wind
- Self-supporting when mounted at one end
- Weatherproof
- Supports both addressable and non-addressable LED strips
- Excellent diffusing capability, with no visible pixels when using 60 LED/m strips
- Full 360º viewing with no dark lines
- Small diameter, ideally less than 1″ (25.4mm)
The first challenge was finding a suitable tubing material. Polycarbonate tubing is great in terms of strength and UV resistance, but is not flexible and doesn’t appear to be available in translucent/frosted colors (for diffusion). High-density polyethylene (HDPE) conduit might be a candidate, but I’ve not yet found a source that sells it in small quantities. I was already aware that cross-linked polyethylene (PEX) tubing, commonly used for plumbing, was a popular choice for LED applications due to the low cost and excellent light diffusion properties. I initially avoided this option due to the extremely poor UV resistance of PEX, but I eventually broke down and tried it.
PEX tubing is commonly available from local home improvement stores in white, red and blue, in both 3/4″ and 1″ sizes. Note that these sizes do not directly represent either the internal or external diameters. For example, “1 inch” PEX has an internal diameter of 0.875″ (22.2mm) and an external diameter of 1.125″ (28.6mm).
I bought small sections of each size, in white since I planned to use RGB and RGBW LEDs. A very quick test confirmed that 3/4″ PEX is too small to provide adequate diffusion, since the LEDs end up being too close to the tubing surface. See this article for the required relationship between inter-LED spacing and LED-to-diffuser spacing.
For my initial test with 1″ PEX, I mounted two WS2815 non-waterproof LED strips back-to-back on a long aluminum strip that is 0.5″ (12.7mm) wide and 1/16″ (1.6mm) thick. To maintain the position of the LED assembly in the center of the tube, I used small zip ties as spacers. As shown in the photos, I cut these to an appropriate length and rotated them into alternating orientations. [Thanks to Gene F for the idea!]


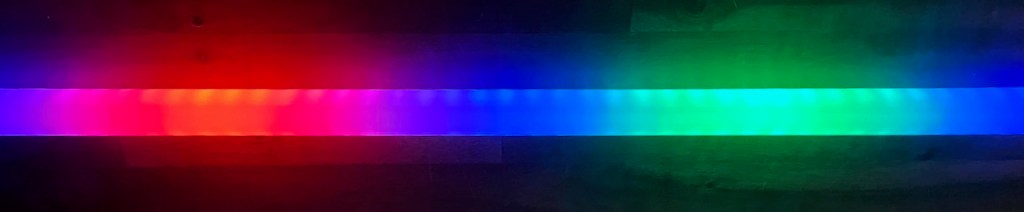
This approach worked great in keeping the LED strip centered, even when the tube is flexed. There is still some noticeable pixellation (see photo at the start of this section), but I think this will be acceptable at longer viewing distances. It actually looks better when viewed from the “side”, 90º from the LED faces, and there’s no dark seam as I feared.
The next step is to try this technique with IP68 weatherproof strips, which are somewhat bulkier. Another possible option is to use IP30 or IP65 strips and seal the ends of the tube to achieve water-tightness. The downside of this option is that it will be more difficult to remove and replace the tubes. Given the poor UV resistance of PEX, I expect that it will be necessary to replace the tubing at least once a year in long-term installations.
I plan to experiment with different substrate materials to achieve varying levels of malleability/flexibility. I’ll also assess the degree to which the metal substrate provides any benefit as a heat sink. I don’t think it’s very useful in removing heat from the closed tube, but there might be some benefit in more evenly distributing heat, preventing hot spots in the back-to-back arrangement. To that end, I may also stagger the strips to avoid exact alignment of the LEDs.
By the way, while I was still considering clear polycarbonate tubing I found an interesting approach to diffusion. White paint or sanding the tube surface produced very poor results. Inspired by the use of pool noodles as diffusers, I found some small-diameter foam tubing that, in theory, would allow me to slit the tubing lengthwise, insert the LED strips, and stuff everything into the clear tubing. Uh, no. Way too difficult to assemble. But another inspiration struck: foam beads! Using these, I was able to insert the LED strip assembly into the tubing and then pour the beads around it.

The foam beads actually worked fairly well as diffusers, but there were two potential issues. First, the foam acts as a thermal insulator that inhibits heat transfer through the tubing to ambient air. The LEDs got very toasty, more so than with the PEX approach described above. Second, after only a few hours of operation the foam beads experienced some shrinkage from the high temperatures. I don’t know how long this shrinkage would continue before stabilizing. In any case, the non-flexible nature of the clear polycarbonate tubing made this a non-ideal approach for my applications.
Butterfly Lighting

There’s another large project that I completed with artist Peter Hazel that I haven’t yet written about. This is partly because the lighting wasn’t very exciting, but now I’ve got some new ideas that I’d like to share.
Peter created a piece called Dancing Monarchs that consists of fused glass butterflies mounted on an 18′ (5.5m) steel tree. He’s now created several versions, and some of his customers want the butterflies to be lit at night. Peter wanted individual soft-white spotlights for each butterfly, with a gentle blinking effect to suggest fireflies. This was a big challenge since the sculpture can be viewed from all angles, and it seemed impossible to position the spotlights to illuminate the glass butterflies without the bright light sources being visible.

I started by trying to find a very small spotlight that could be easily mounted on the tree branches and be positioned to illuminate the bottom of a single butterfly, while being hidden from direct view. My first candidate was the 1W 12V soft white floodlight shown at right. I realized that I needed the wide 120º beam angle of the floodlight, rather than the 25º beam angle of the similar spotlight, since the lights would be mounted so close to the butterflies. But even though these lights are only 1.5″ (38mm) in diameter, they turned out to. be too obtrusive and too bright.

My next choice was a truly tiny floodlight made from a single 5050 soft white LED attached to a flex cable that also included a current limiting resistor that allows the light to operate with a 12V PWM driver. These waterproof lights are so small and light that we attached two of them to each butterfly mounting bracket with silicone adhesive. The resulting brightness was fine, but it was still very difficult to shield the light source from all viewing angles. Overall, the result was just barely “OK”.
Now I’m thinking about a completely different approach to light the butterflies. Over the past couple of years I’ve been experimenting with edge lighting techniques, which are discussed in my article LEDs for Light Art – Part 3: Lighting Techniques. One approach involves the use of a special type of acrylic sheet that is currently manufactured by only a single company. It has the awkward name ACRYLITE® LED LIGHT GUIDING EDGE LIT SHEET. This material contains microscopic diffuser particles that redirect light beams toward the material faces when illuminated from one or more edges.

When not edge-illuminated, the material is completely transparent. With illumination, the sheet has a bright, milky white appearance. Reflective metallic tape is applied to the non-illuminated edges to maximize light emission through the faces.
My plan is to apply this material as a backing to each of the four glass wings that comprise each butterfly, with each piece of acrylic cut (routed, actually) to exactly match the outline of the glass. I’ll illuminate just one edge, and fortunately each wing has one straight edge. I made illuminators with 5″ (127mm) sections of soft white FCOB LED strip mounted in pieces of narrow, low-profile aluminum channel.

One challenge I’ll face is that the Acrylite material is very difficulty to source, especially in small quantities. I’m still working on that, and for now I only have one small sample. But I think the results of my initial test (below) were pretty spectacular.
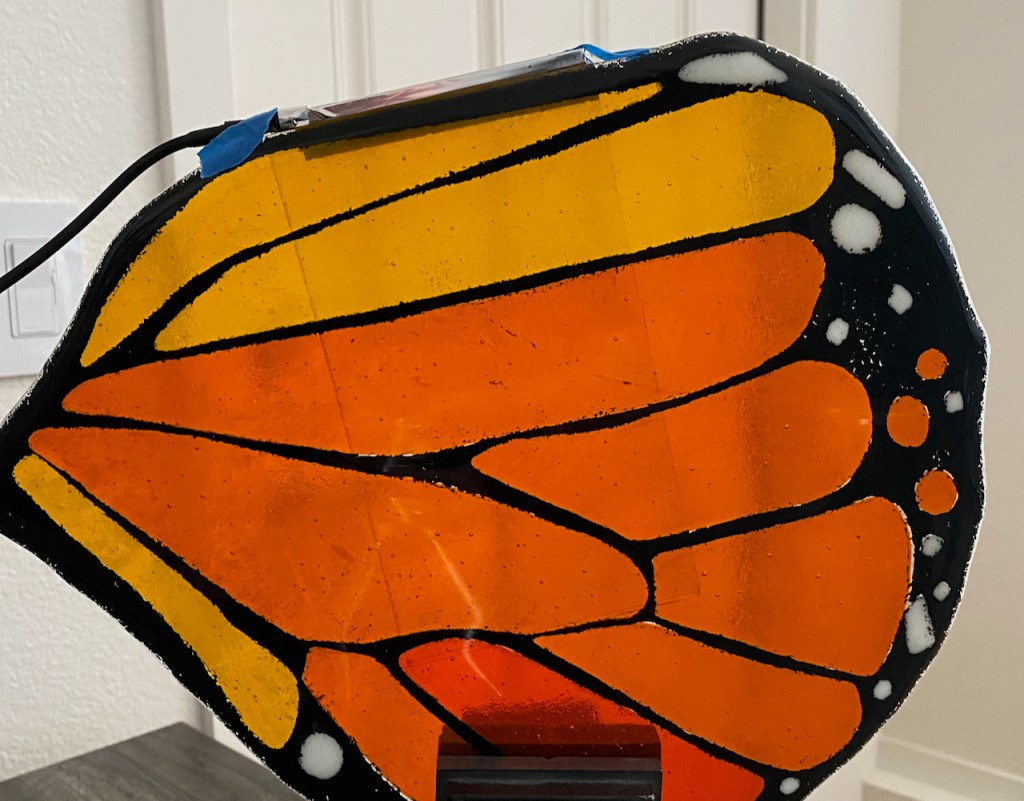
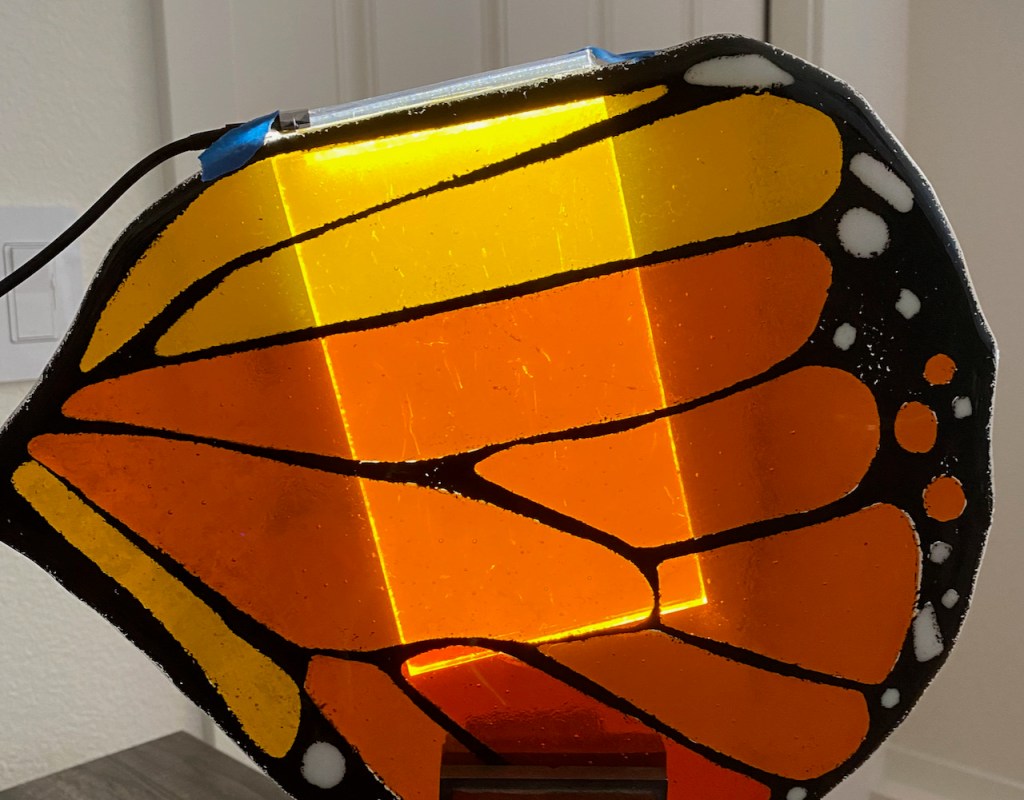
Under ambient lighting with no edge illumination, the acrylic was barely visible. When the edge illuminator is turned on, the additional backlighting of the glass is very pronounced and uniform. And without ambient light…wow!

One issue is that, while the illuminated butterfly looks great from the front, it just looks milky white from the rear. This can be resolved by sandwiching the acrylic between two pieces of glass, but this adds significant cost and weight. It may turn out that this lighting technique may only be useful for artworks in which the glass can only be viewed from the front.
Interactive Lighting
Many of the most-loved art installations at Burning Man are those that incorporate some element of interactivity. The simplest and most common type of interactivity is the ability to climb inside or on top of the artwork. Even better is lighting that somehow responds to human presence or actions. Although I’ve dabbled with this in the past, I’m now getting more serious about including interactivity in my future designs. I plan to start by experimenting with various types of sensors, and building a “tool kit” of hardware/software designs that can be applied to my future projects.
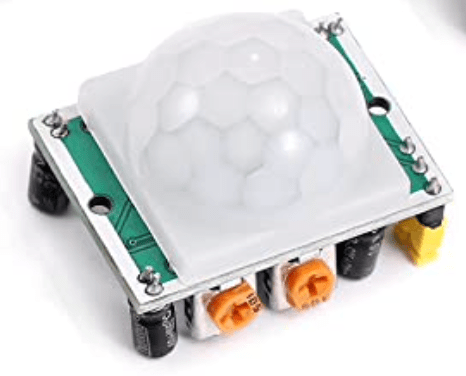
I’ve previously used an inexpensive passive infrared (PIR) sensor to detect when a person is standing in front of an artwork, triggering a fixed-duration light sequence. This was fairly simple to implement, but there were a few operational challenges. First, when power is applied the sensor requires 30-60 seconds to stabilize (self-calibrate?), and during this period there should be no motion in the sensor’s field of view. The sensor triggers when a moving infrared emitter (i.e. a human body) is detected, so the sensor won’t retrigger at the end of the sequence if the audience remains stationary. But it will trigger when they leave; not exactly what you would want. Finally, a PIR sensors work best at lower ambient temperatures, and it’s unclear how reliably it would work in a hot, dusty desert environment. Fortunately, a Burning Man lighting application would only need the PIR sensor to work well at night when the temps are much cooler.
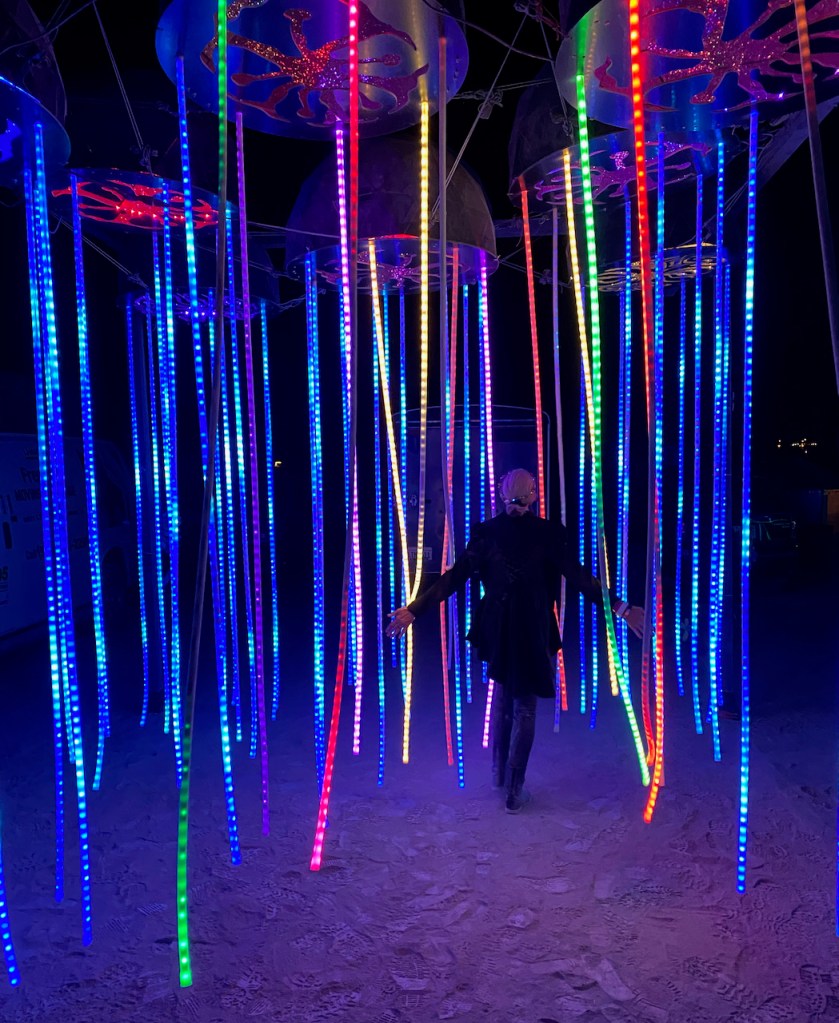
Some art/lighting installations are touch-reactive. In the piece shown at right, the dangling LED “tentacles” change color when touched. I haven’t yet learned what type of sensor is used here, but this led me down the path of exploring accelerometer sensor boards like the one below.
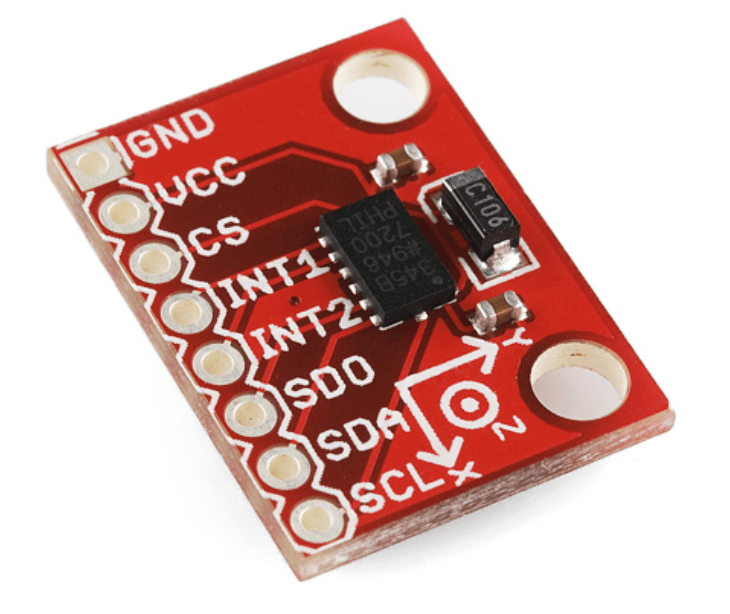
This board can detect acceleration in three axes with 13-bit resolution. Built-in functions can be used to detect vibration and “tap” gestures. This type of sensor might be too expensive ($20 each) for something like the “tentacle forest” above, but it certainly opens up some interesting possibilities.
Another type of interactivity is based on sound. It’s become common for LED lighting installations to be “sound-reactive”, where an audio-enabled microcontroller processes and analyzes audio input from a microphone. In real time, the controller identifies different frequency ranges in the audio feed (typically music) and also isolates the bass tempo. This information is then used to control the hue, brightness, and timing of a pre-defined light sequence. Instead of music, a this approach could also be used to respond to human voices (singing, chanting) and rhythmic drumming. This could lead to some interesting installations, where the audience has to guess and experiment to figure out how to control the lighting. Hmm… I definitely plan to do some more research along these lines.
———————
OK, enough rambling; I need to get back into the shop and build! Thanks for reading!

Your stuff just absolutely rocks!!
I am super new to all of this stuff and you are super inspiring. 6x burner and finally created our own camp (you light up my ride, to light up darkwads). Built out custom LED whips for all my camp mates, which were pretty primitive but worked well. Taking my first LED class at the Crucible in Oakland in a few weeks. Really, really interested in finding the time to dig into working with LED’s, as it is my favorite aspect of the playa.
Just wanted to give you a quick shout-out. I cannot follow a lot of your detail but one day I will. Absolutely love the shark and excited to read your future stuff and see your future work.
Stay lit!
Playa Moth
LikeLike
Playa Moth (great name for a lighting designer),
Thanks so much for your feedback! I started my blog to (hopefully) inspire and help other people, and it’s comments like yours that keep me going. Good luck on your journey of learning, and feel free to ask questions if you get stuck on something.
-Keith (Faraday)
LikeLike